Viewing posts by pat
DIY Speakers
Posted by: pat 10 years, 3 months ago
Fair warning: this is going to be a long read. It's my blog and I'll be verbose if I want to, and I am known to fly off on tangents. Executive summary:
- I'm building some speakers. Later I plan to build a tube amp to pair with them.
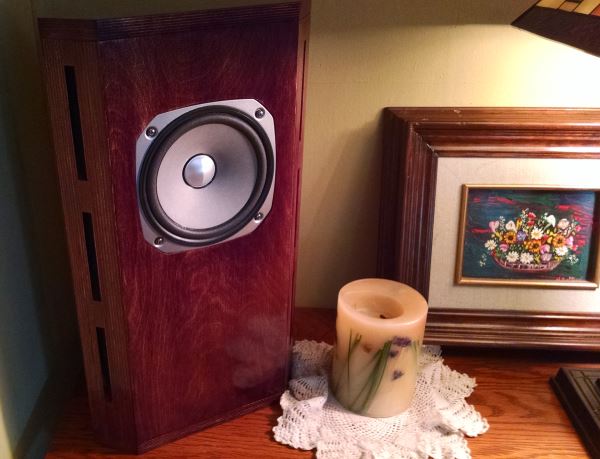
- The design is for a full range single driver, the Fostex FF165WK. The enclosure is a 17 liter trapezoidal miniOnken designed by planet_10 hifi out of Victoria.
- It has been a fun and rewarding project, but was not without its pitfalls. See the lessons learned section at the end for traps to avoid and tips.
Here beginneth the tale. Warning: the tale is not yet done, and will be updated as the speakers are completed and auditioned. Currently speaker #1 of 2 is fully complete and is undergoing a gentle breakin period with a bit of the old Ludwig van.
Prologue
My latest hobby project is building a pair of full range single driver loudspeakers. When I explain this project to friends and family, inevitably the question "and why exactly are you doing this?" comes up. My response generally includes the following points in no particular order:
I enjoy music, and I value high fidelity. I also believe that the commercial high fidelity audio industry generally extracts a very high margin from their customers, and price is only sometimes a signal for the level of quality: while I value high fidelity, I would never pay $5,000 for an amplifier or pair of speakers.
I believe in the hypothesis that just as high quality custom DIY electronics projects are now both very affordable and eminently do-able for the home hobbyist (e.g. Arduino, Raspberry Pi, etc. etc.), a hobbyist should also be able to build their own high fidelity audio components at home.
There are thriving communities on the internet where like-minded individuals share their knowledge and experience doing this kind of thing. I am interested in building something from scratch, from base components, but do not want to design it myself. I want to build something that has some level of grass roots community validation of its value proposition and quality. This blog post is a kind of thankful contribution back to the community, partly motivated by the hope that someone else can learn from my experience as I have from others'.
I am curious and intrigued by the following hypothesis: high fidelity DIY audio components may be built at home at a small fraction of what an equivalent commercial product would cost. With the subjective and personal nature of audio quality assessments, the only way to test this is to do it myself.
This project intersects with three distinct hobby interests: woodworking, electronics, and music. I have a decent home woodworking shop. Lately it has been used mostly for home maintenance and not really building interesting things from scratch. This project used most of my tools, including several that hadn't had an electron flowing through them for a few years.
I look forward to auditioning these speakers in blind A/B tests in the homes of my music loving friends. If the improvement from my current speakers is not evident I will reject the hypothesis. I hope to have my socks knocked off. Even if the speakers end up failing to deliver a superior experience with my current sources, they are a necessary first step towards my long term home audio vision which includes a DIY tube amp. And it has made for many pleasant hours of solitude in the workshop, which is its own reward.
Research and Design Selection
I backed into doing a speaker project. This whole odyssey started with a desire to build a tube amp. Same motivations, different project. The problem is you usually need to have very high efficiency speakers for a tube amp. To do things in the proper order, it made sense to make speakers first. Speakers also have a wider application. If they are truly as awesome as I hope they will be, I'll proceed to replace all of the wall-mounted bookshelf speakers in my home theater with DIY speakers.
I want a design I can build myself, but I had no desire to design it myself...that would reek of hubris given my total lack of experience and knowledge of speaker design, something that became even more apparent as I started seeing the maze-like convolutions hidden in the interior of many speakers. Ideally I wanted something in the large bookshelf size range. As I dug into my research I ended up spending a lot of time on the diyAudio site, where I learned from proponents of a specific type of speaker design, the full range single driver loudspeaker. The simplicity of the design was appealing for a first timer like myself. And the idea that technology has advanced such that separate midrange, woofer, and tweeter drivers might be unnecessary and indeed come with a cost in the form of the crossover, which some argued had a deleterious impact on the resulting audio quality, seemed to fit into my whole hypothesis around the value of using simple high quality materials. A part of the thinking behind the hypothesis is that a craftsman can hand-tailor a project around materials of a much higher quality and with more attention to detail than a commercial manufacturer would use. It is the same ethos that drives me to hand build computers, selecting best of breed individual components and assembling them with the care that no manufacturer would ever devote to a product sold at retail. My hope is that a $100 driver available to a hobbyist might surpass the driver quality in a $1000 commercial product.
There were other reasons behind going full range single driver. If the low frequencies just aren't there to the degree I want, boom, I've got the motive for building a new DIY subwoofer. I'm also not too worried about the high frequency end of things, as a lifetime of occasional poor choices about environment and hearing protection (as well as age!) has rendered my body incapable of hearing frequencies beyond around 14k. Try some of the various test tones yourself, and do it together with a 10 year old to be humbled. Why spend money and introduce the unintended consequences of a tweeter and its accompanying crossover if I can't even hear what they produce? Because to hell with everyone else's ability to hear a cymbal ringing at 17k, this is all about ME!
I was thinking these speakers could live in our living room, where I have a couple of two driver bookshelf speakers I built from a speakerlab kit back in the 80's, and/or they could end up in the home theater where I currently have bookshelf speakers from Ascend Acoustics. You can tell I've always been a value conscious buyer. Someday I might see if I can build a sub to surpass the M&K in the home theater. Anyhoo, point being I initially saw this project as a bookshelf size.
At this point I maybe got carried away with the research and ended up gravitating to a driver that would push me to pretty much the far extreme of what anyone might call a bookshelf. The Fostex FF165WK. In hindsight maybe that was a mistake. Perhaps I was over-sold by the promise in the specs for this driver, stuff like "For the surface layer, the bincho charcoal powder is blended with a short-fibered (high freeness) kenaf, which allows to accelerate the propagation speed on the cone paper surface." It's all about the kenaf! OK I understand about as much of that as you do.
The increased size does open the possibility to just go without a supplemental subwoofer however. Some folks say I will be pleased and surprised by the bass extension.
My short list of plans were to build a Karlsonator 6, purchase a plan from Brines Acoustics, or build a mini Fonken design from David at planet_10 hifi. I can see how one can easily get sucked into analysis paralysis, and also how one could end up trying to build and compare all of these. I ended up going with a trapezoidal mini Fonken. I remain intrigued by the Karlsonator and curious how the complex trapezoidal mini Fonken would compare to the simpler classic golden ratio design.
I do have some regret still about the size. At almost 22" tall these are probably more appropriate on a stand than a bookshelf, and they very well may end up on stands. And if you are going to build a speaker that needs a stand, why not go whole hog and build a full size floorstanding Fonken for the benefit of more bass extension? Well that's hindsight for you.
Materials
One of the appealing aspects of the planet_10 hifi plans was that it uses a single sheet of 3/4" 5x5 Baltic birch plywood with little waste. It also neatly allows for getting the sheet cut twice at the lumber yard into three pieces 20" by 60", making transport a snap. I ended up making enough mistakes that a second sheet was required anyways. All of those bevels...I ended up gluing up one of the side assemblies with the inner side panel reversed. And then I cut the tops and bottoms just based on the plan drawings without accounting for the fact that I omitted the optional cosmetic cuts from the side panels.
I purchased the drivers and some terminal cups from Madisound.
The 1/2" high wool content felt was a challenge to find at a reasonable price. McMaster has it, but shipping is exorbitant. Gardico, a local industrial materials supplier just a few blocks from my home, is one of only two places on the west coast that actually stock the stuff. But at about $15 per square foot...ouch! The felt shouldn't cost more than the wood, or at least that was my pro-wood biased judgment. I ended up buying a 4x6 1/2" wool felt rug pad from rugpadusa.com. It arrived in a tight roll and I was disappointed with the actual thickness measuring about 3/8" of an inch. As it relaxed it did loft up a bit, but 1/2" is pushing it. At least the price was right.
For finishing I used Zinsser canned shellac, every one they've got: unwaxed SealCoat, Clear, Clear in an aerosol can, and Amber. I also used TransFast powdered mission dark brown aniline dye dissolved in alchohol, and a final treament with Behlen paste wax.
Construction
What fun to turn large pieces of wood into smaller ones and piles of sawdust and shavings.
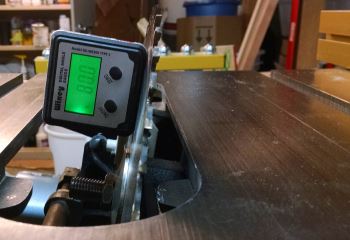
This project calls for many unusual bevels. I am so glad I bought this little guy to nail the angles. Everything came together perfectly thanks to the precise cuts this enabled.
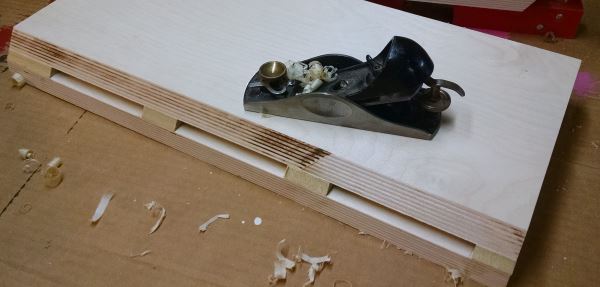
Always nice to get some hand planing in. I left the 9mm poplar vent spaces slightly proud and planed them flush. I'll sand out the table saw blade burn marks later.
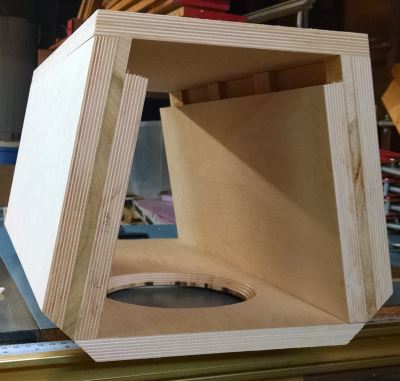
Test fitting those complex bevels. You can see the vent spacers go all the way back because...I don't know! I am just following the plans...
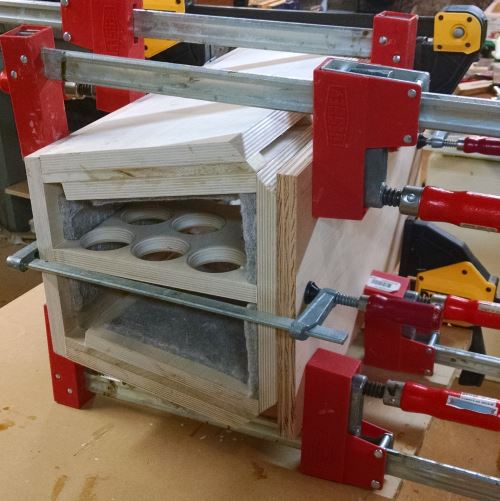
The big glueup! It worked pretty well. The top ended up just slightly caddywampus which I corrected the best I could with a light touch from the belt sander. Other than that it is all square and tight. I tested the driver fit against the brace and then glued the top and bottom on. Some would screw the back on for any required maintenance or possibly adding more fill I guess, but I figure the driver hole will accommodate that need just fine. I left the top and bottom proud of the sided and trimmed with a flush trim bit with a bearing on the router table. Nice and clean!
Finishing
I have a love/hate relationship with finishing. It is usually a humbling experience that leaves me concluding that either my skills have a long way to go, or I need to bite the bullet and get an HVLP spray rig. "Yet we all keep trying, like fools!"
Birch is a problematic wood. Kinda boring, not as pretty as maple, and prone to splotchiness when staining or dying if you don't seal it properly first. Many would just veneer this project with a more reasonable wood like cherry, walnut, oak, padauk, zebrawood, ebony etc. Not me, I decided I would honor the integrity of the materials in the true spirit of the arts and crafts movement, or some such BS. This project is about function not form! I did some test panels and solicited input from my design focus group (also known as the wife) to settle on a relatively dark brown mission dye with shellac top coats.
I enjoy working with shellac. It is non-toxic, dries very fast, and looks nice. It isn't the most durable finish, but it is definitely a classic look.
I am not happy with how the finishing has gone so far. I think I've managed to salvage things, but boy howdy did I make some mistakes. See the lessons learned section for more on how I would do this again...which I will need to do on speaker #2 and my god will it be a challenge to make it match the contortions this speaker has gone through on the finishing table!
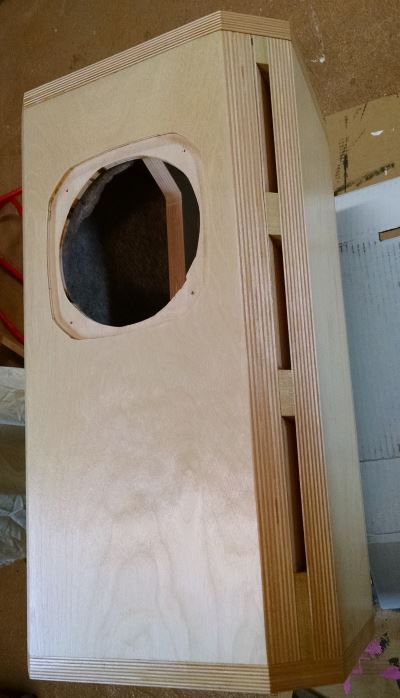
Here we are with three coats of 1 lb cut unwaxed clear SealCoat shellac. Looking good! I brushed it on with a china bristle brush and it went pretty darn well. Too bad it would all be for naught as I ended up stripping all of it off after making some unrecoverable errors.
At this point I made up the test panels and decided to use the TransFast dark mission brown dye. I considered going pure shellac, no dye, which I was definitely confident in my ability to execute. Feedback from the focus group was that clear shellac was "too Ikea" (agreed) and amber was too orange. So the mission dark brown dye it was to be. I bought this stuff a long time ago, and I guess since then they've ceased recommending dissolving it in alcohol due to so many problems. I have a tendency to want to use stuff just because I have it in my cabinet, sometimes when that's not really the best decision. My economics training tells me I should approach things more rationally, considering the $10 I spent on that dye 15 years ago as a sunk cost irrelevant at the margin of today's decision. Throwing rational thought to the wind, I vowed I would get my money's worth out of that $10 expenditure and use the dye I have on hand! Anyways, this stuff was tough to work with in combination with the alcohol-based shellac. You have to really nail laying it down smoothly and evenly. There really is no fixing little uneven areas later with any touchups or blending. I tried and ended up just dissolving through the layers and making matters worse, ultimately ending up with a little patch of completely bare wood that would never match its surroundings. I learned this the hard way and stripping the whole thing down to bare wood and starting over. That was frustrating, but don't we all learn best from the experience of our own personal mistakes? The only saving grace was that since it was all alcohol-based, with about 8 ounces of DNA and a bunch of paper towels I got the whole thing back to bare wood in about 15 minutes.
When I put it all back on for the second time, I did my best to get it looking as perfect as I could while it was still wet. Get it right, and then try not to screw it up as I apply the shellac. I padded the dye on just like you would pad shellac on. It went pretty well this time. Not perfect, but good. A little uneven in tone in some places, but definitely without the problem spots I tried and failed to rub and blend out on attempt #1.
My troubleshooting research gave me a tip: seal off the dye coat with a series of light coats of clear shellac from an aerosol can. Yes! A solution! Well I ended up screwing that up too, getting too eager and laying the first coat on too thick. Imagine my horror as I see it dissolving the dye into little spots right before my eyes! I ended up stripping the front panel for a second time to correct this, but the sides and top were not impacted quite so badly and I left them. Time to move on. Fortunately, the subsequent shellac coats evened out some of the lifting/pooling of the dye. I could see the dye coming off on the shellac pad, so it wasn't totally sealed off, maybe for the best.
I started shifting my background conversation to a narrative about how this will be a one of a kind piece with a lot of character...maybe not something to go in a museum but a true original beauty. There are certainly less generous ways to describe it while simultaneously pointing out improvements required in the application technique, but what's done is done and better to look on the bright side. As the creator, sadly I can only see the defects. To the uninitiated it probably looks fine.

Above is how it looked after a few coats of amber shellac. I ended up with 4 coats of amber.
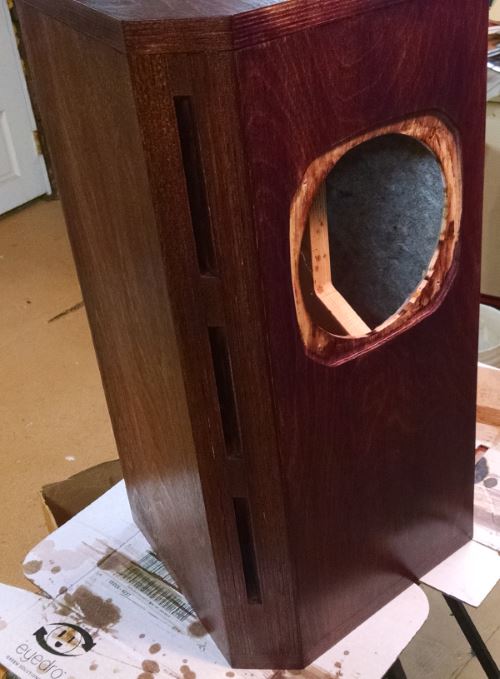
Above is building up the clear coats. It is getting pretty dark and glossy. I can see my reflection in it.
I'm glad I shifted from my initial plan of brushing the shellac on to using a pad instead. I aspire to be much better at brushing on both shellac and varnish than I presently am. I have a boat and while it has been updated to minimize the brightwork maintenance requirements, there is enough still there that I've had to get pretty comfortable working with varnish. That is a pain compared to shellac -- shellac lets you recoat in one hour and it doesn't matter too much if you go longer. With varnish, you have to hit it again in 12 hours, every 12 hours. I've got some nice brushes, including high quality natural bristle brushes, with separate brushes dedicated just to varnish vs. shellac. And I've got a brush comb and a spinner. Point is, I want to be a smooth-brushing craftsman but I'm not as facile with a brush as I am with a pad, at least right now. I always end up with some lap marks or other visible variations with a brush. I'm very satisfied with the quality of my pad application, so I set aside the $40 brushes and reverted to a simple pad made of 25 cents worth of rags. I charge the pad while I am using it with shellac in a 4 oz squeeze bottle. I can get a full pass, recharge, and another full pass before it starts dragging and I move on. No drips or runs ever, and with good raking light source you can easily control coverage quality.
Here is the full finish regimen:
- Royally screw up a first attempt and strip it bare with denatured alcohol (DNA)
- Single sealing washcoat of 1 pound cut Sealcoat unwaxed clear shellac
- Pad on one coat of transfast mission dark brown dye. 1 tsp dye powder dissolved in 5.5 oz DNA, dissolved overnight and strained.
- Many of the lightest possible coats of aerosol spray clear shellac. Maybe 8 or 10 dustings. Don't let it run or pool in any fashion or it will dissolve the dye and you will be stripping again.
- 4 coats padded 1 pound cut amber shellac
- 1 coat 1.5 pound cut clear shellac
- 4 coats 2.25 pound cut clear shellac
- 2 coats 1 pound cut clear shellac
- 1 coat Behlen's paste wax
And that's where things stand today! The speaker is plugged in and undergoing its breakin period. After 50 hours or so I'll test it out at higher volume levels. More updates will come as I build speaker #2 which will hopefully go faster, and perform some exacting but totally subjective evaluations. But it will be October soon and I must shift gears to getting my DIY robotic Halloween props ready, so that might slow down speaker construction. Patience, grasshoppers.
Lessons Learned
I built the speakers one at a time so I could apply any lessons learned while building the second one. Once I got into the finishing stage I realized this will make it a bit of a challenge to match their appearance. As a mitigation against this risk I kept notes of the exact finishing steps.
I think I would try the allegedly higher quality Apply Ply next time. With the exposed end grain, any defects or variations in the plys inside the plywood are visually distracting. Or veneer it I guess. I was interested to discover in my plywood research that Apple Ply has nothing to do with the apple wood species. It is manufactured in America as a domestic alternative to cheap imported Russian or Baltic birch. The naming is supposed to evoke a jingoistic patriotic response as this plywood is as American as apple pie. Apple pie. Apple ply. Get it? Har. Strange but true.
The magnetic digital blade angle measurement doohicky I bought was invaluable for achieving consistent and precise bevel cuts on the table saw.
Cut the backs and top/bottom slightly oversize. Trim them flush with the router and a flush trim bit. This gives you a little wiggle room during glueup. I used this as an excuse to buy a new Whiteside solid carbide downcut double bearing flush trim bit. Arggh!
Glue up the sides first. Glue up the vent spacers slightly proud of the plywood. Hand plane flush after they dry.
I glued up the side assemblies, front, back, and brace as one assembly. Then I fine tuned the brace to driver fit and glued on the top and bottom last. I would do it this way again.
Would I use the same finish protocol? Yes...I do like the results, and I always enjoy working with shellac, but I would only do it again with some hard earned knowledge of how to manage a dye in alcohol solvent layered with shellac, also in alcohol of course. You absolutely can't work over or rub hard any trouble areas or you will dissolve right through everything to the bare wood again. I found padding the dye on, just as I pad on shellac, with smooth decisive strokes, gave the best results. If there are lap marks or any other irregularities, do your best to work them out while keeping it all wet. After the dye dried I sprayed it with many...maybe 8...extremely light coats of aerosol spray clear shellac. This is the part I messed up: it is very easy to put too much on and it will dissolve the dye in odd spotty patterns. I did bare mistings, which dried in minutes allowing many coats in a few hours. And of course one of the silver linings to making any mistakes with this regimen is that a good sloshing and wiping of denatured alcohol will take any mistakes back to bare wood in a matter of minutes, so if you aren't happy with it you can get a do-over.
It Ain't Over Til The Fat Lady Sings
As I mentioned way up at the top of this post, I'm not done! Come back for updates as I build speaker #2 and evaluate the results.
Summer of the deck
Posted by: pat 10 years, 4 months ago
As we close out the summer, I realize that if this summer was to have a theme for me it would be "the summer of the deck."
We had an ipe deck built for our 10th wedding anniversary present to ourselves. That was 12 years ago. "You can just let it weather to a beautfiul gray" everyone will tell you. Maybe that works in places like Arizona, but the northwest hammers the horizontal surfaces with relatively warm rain all year round, which forms a volatile soup with the molds, spores, and pollens that fall from the sky and form great drifts on the deck. Yes it weathers to a nice gray. But that rapidly transitions to green as the slime takes hold. Not only is this aesthtically displeasing, but it is also a safety hazard as it becomes quite slippery when wet.
I've always shied away from the crushing burden of a disciplined deck maintenance program, giving the deck the occasional scrub and pressure wash to alleviate the safety issue. But then I thought if maybe I did just a little more work and was disciplined about it, maybe, just maybe, I could create a hostile work environment that defies the PNW mold/mildew/spore brigade. And it might look a lot nicer to boot.
After much study and research of everything on the internet, I decided to make a commitment to Penofin. Penofin for Hardwood, to be more specific. This is the begininng of a new long term relationship with this PENotrating Oil FINish. I know I am getting into a recurring cycle of maintenance to keep it up, with an initial application followed by a maintenance coat at 3 - 6 months, followed by an annual maintenance coat. That still sounds like less work than I was doing with the pressure washer though.
Overall the work has been worth it. This was a great summer for the deck, especially with the shade awning deployed and the optional sunset shade ready to roll down. We catch a nice breeze on the deck, and with the hot sunny summer we just had it was an oasis in which to read, listen to music, dine al fresco, enjoy a beer or a glass of rose, and we even hosted a big crab feed for a bunch of friends. Good times. On the deck.
So anyhoo, let's check out some photos documenting my journey with Penofin thus far!
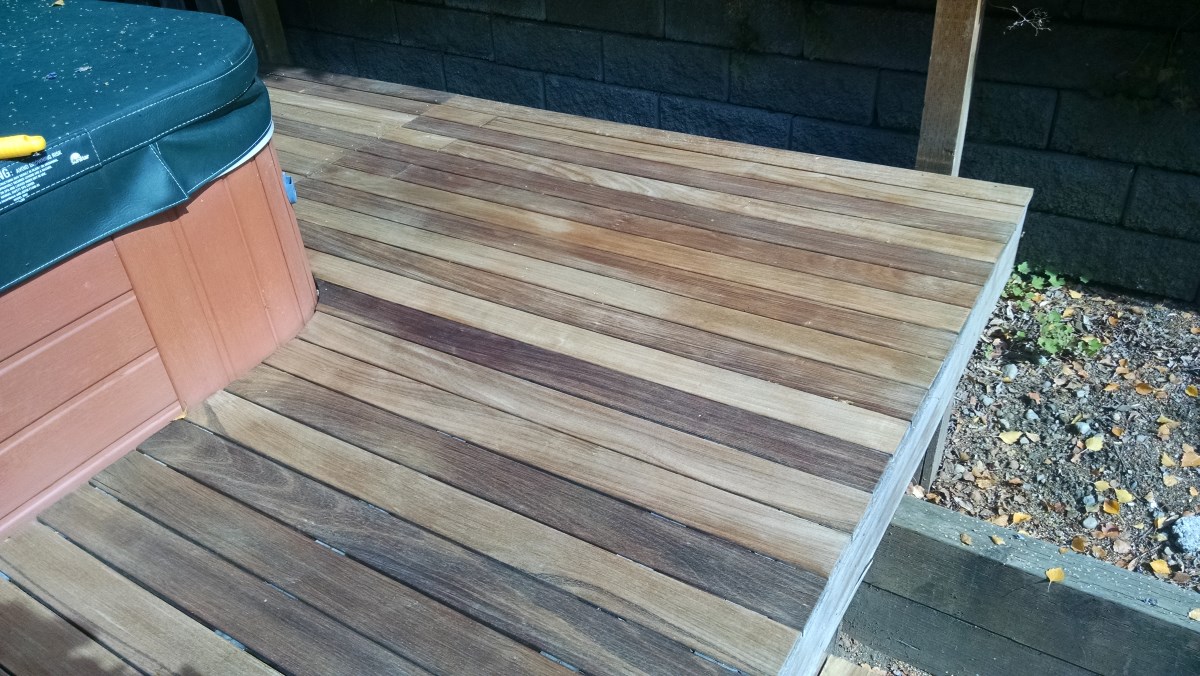
Original deck surface, June 7 2015:
Note the green hue.
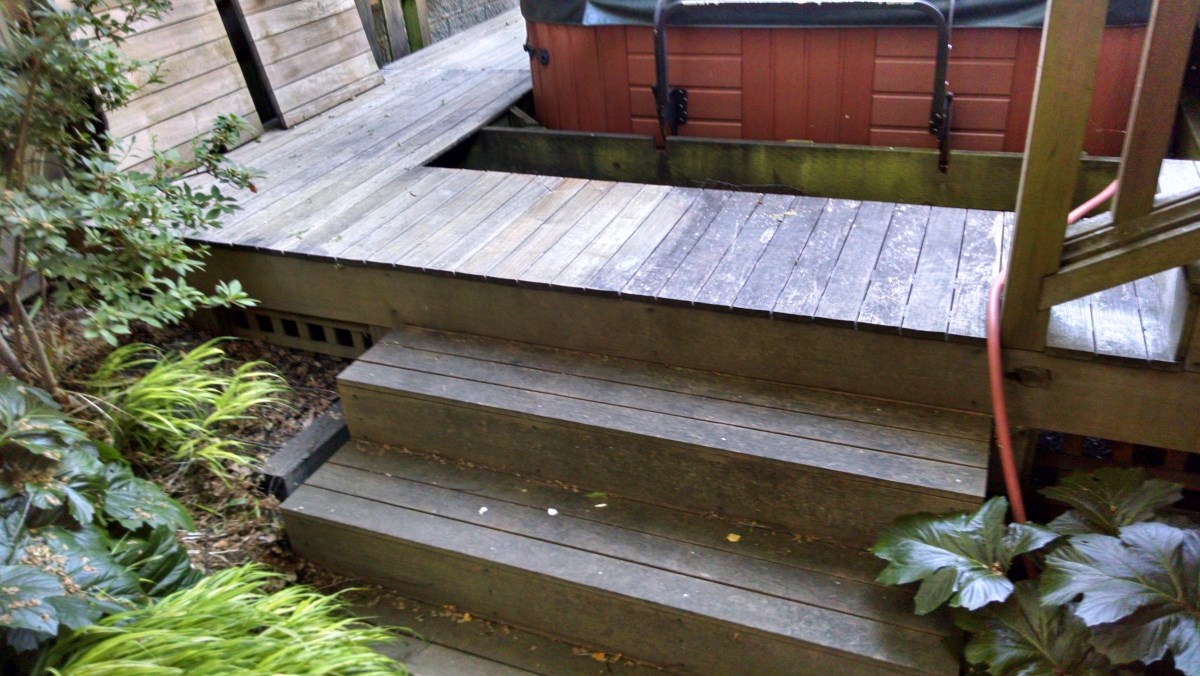
In the above photo, there are about 4 cleaned boards next to the filthy ones with the full winter's acculumation of growth.
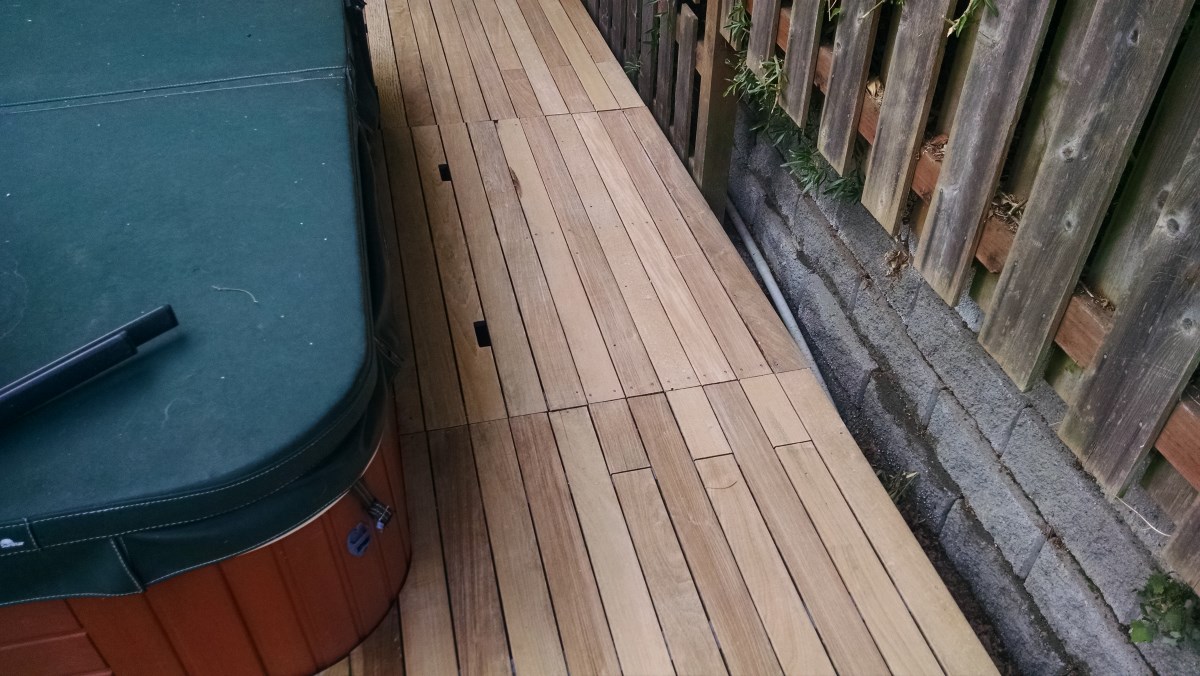
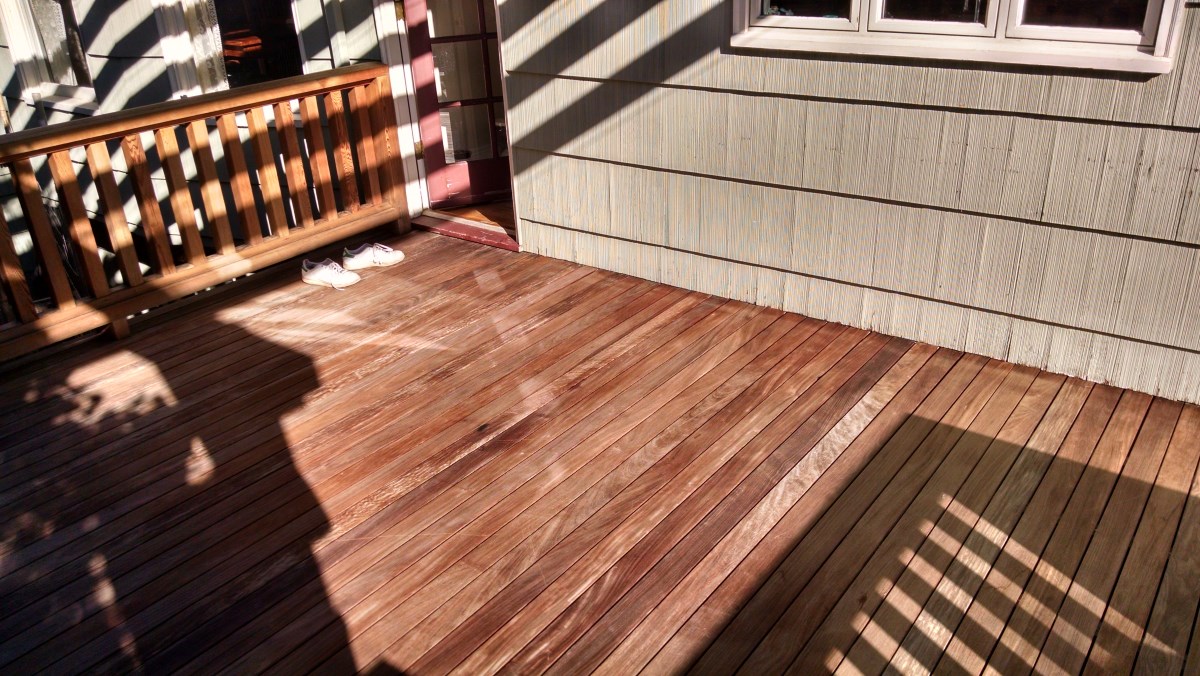
After maybe half a dozen rounds of pressure wash, scrub, scrub more, scrub with different mixes of oxy clean, dish detergent, and specialized deck cleaning products, and a final round with a wood brightener, here we have the restored deck ready for its first encounter with Penofin.
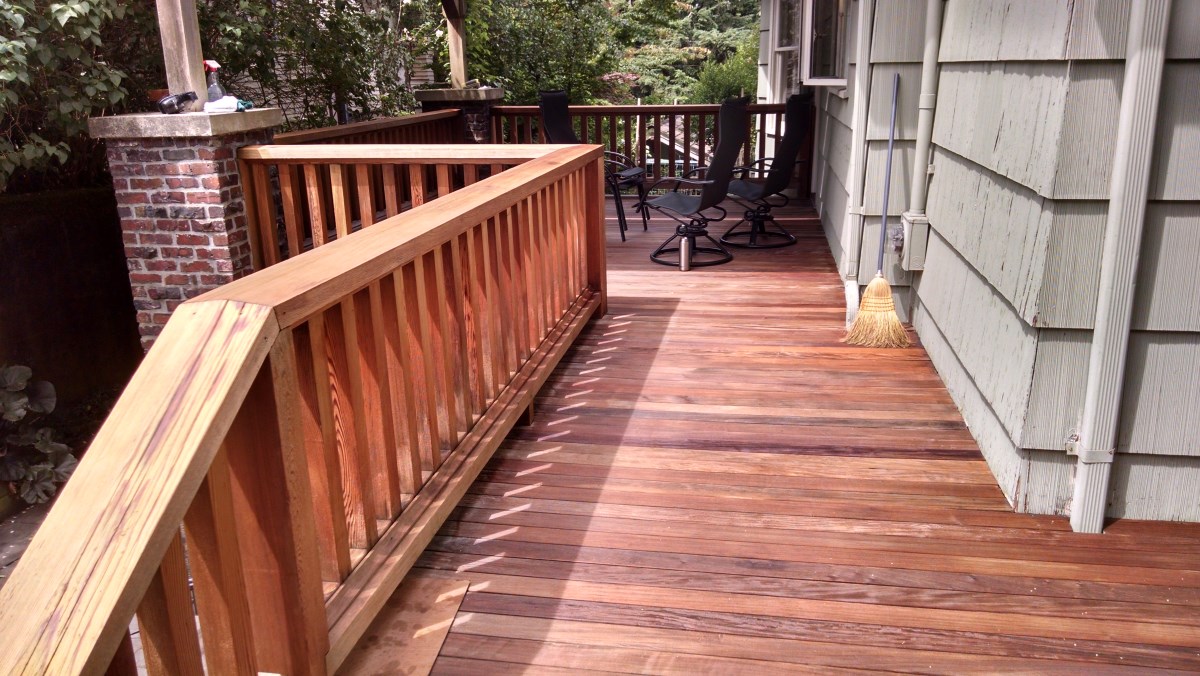
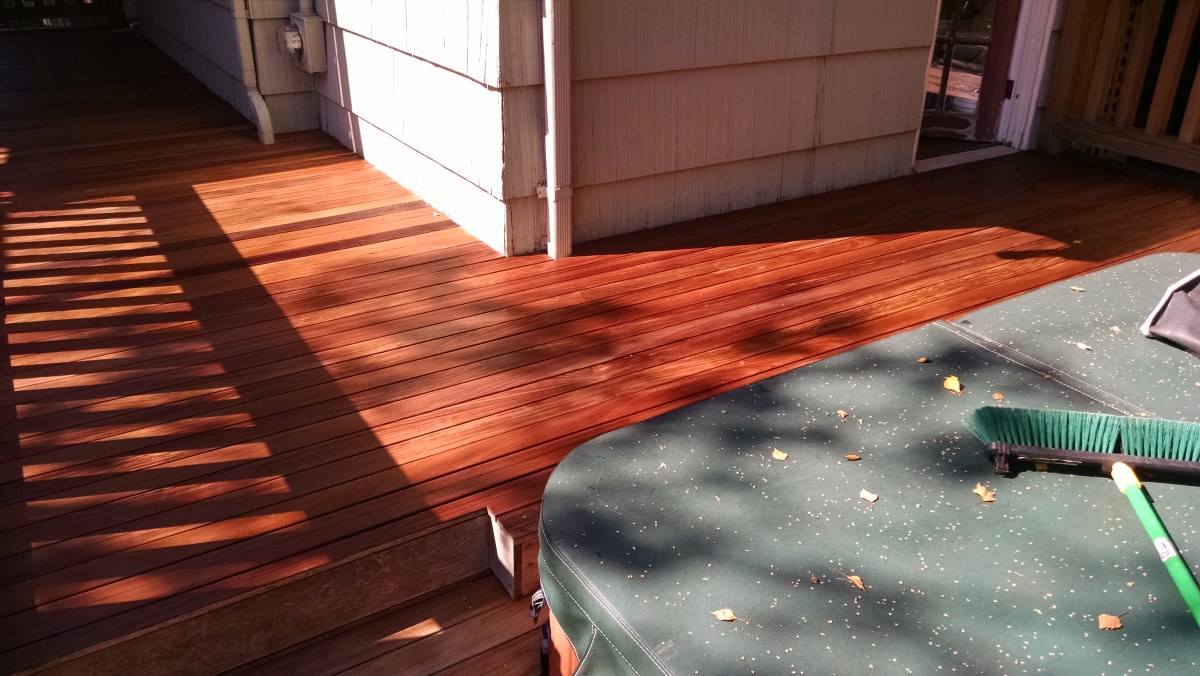
And here we are June 24 with the full first coat complete, wiped down, and cured.
You can see the penetration is a bit uneven. They say ipe is more of a marketing label and not really a specific tree species, and here we see the varying boards taking up the finish differently.
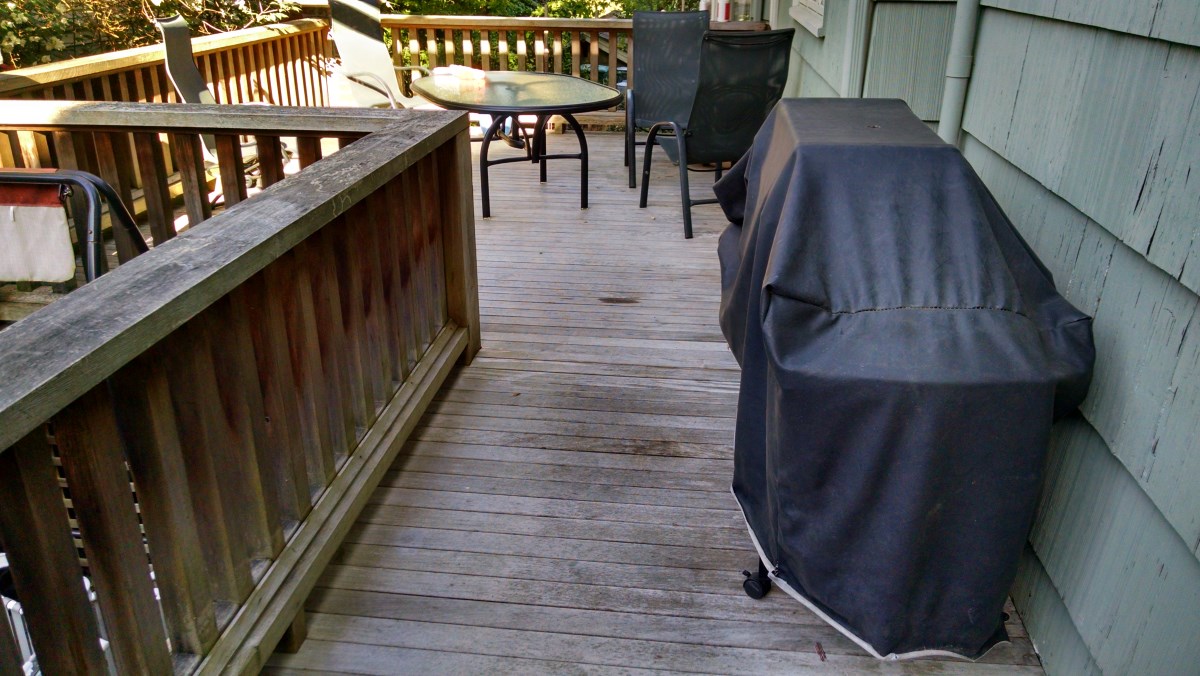
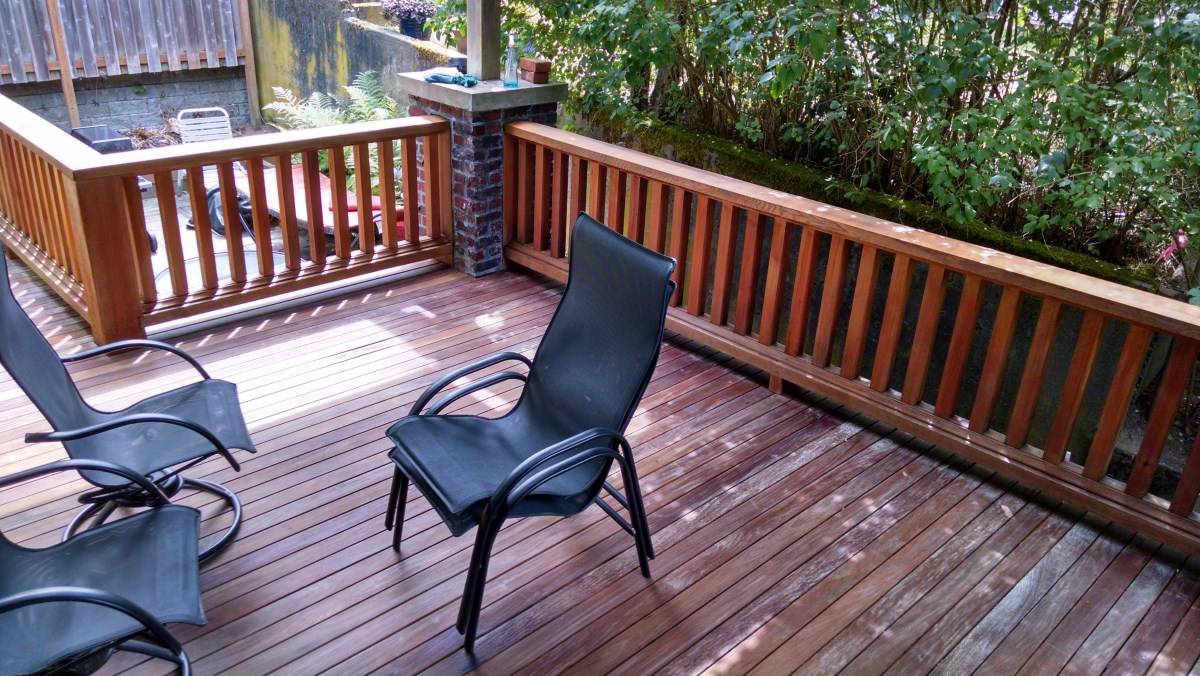
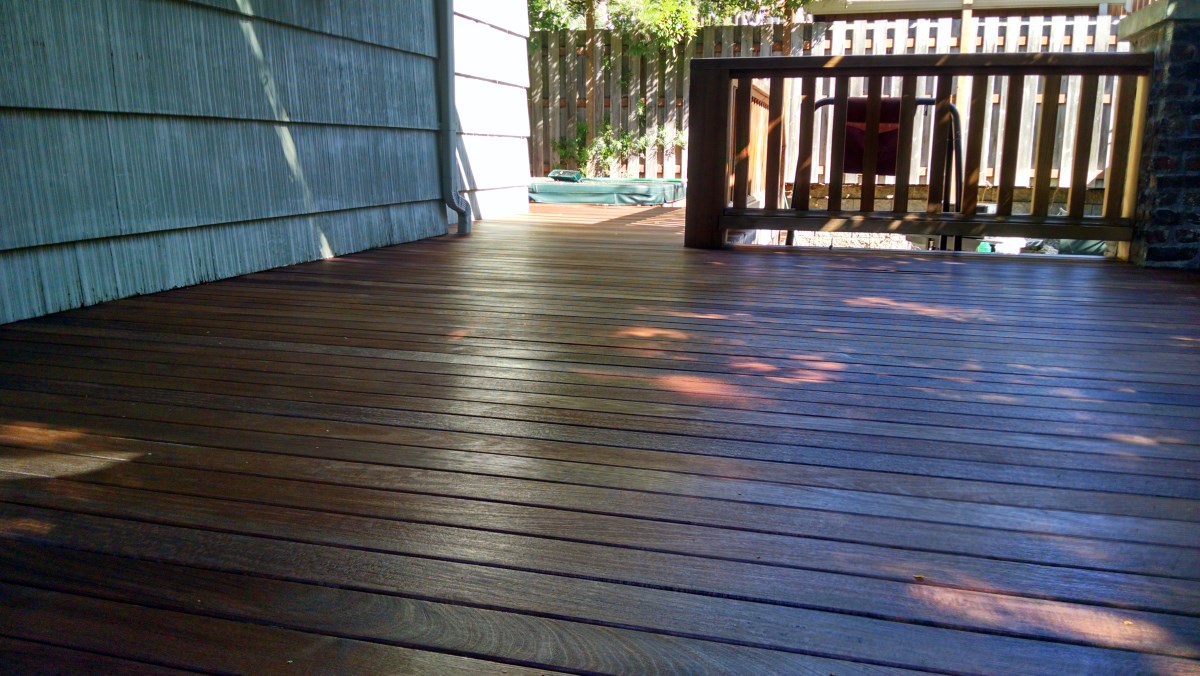
Fast forward to September, the end of the summer, and here is what it looks like after a very cursory scrub down in preparation for the first maintenance coat.
Et voila! First maintenenace coat is on and the finish seems very even so far. We'll see how it looks in the morning.
Achievement Unlocked: Monday NYT Crossword Puzzle Completed!
Posted by: pat 11 years, 10 months ago
I've been working the New York Times crossword puzzles off and on over the last month or so. Cathy got me into it via her obsession with the Hocus Focus and Wonderword puzzles.
Today I am proud to announce I have completed my first ever newspaper crossword puzzle! One step further away from dementia...
OK, so it is only the Monday crossword. And Kim gets credit for giving me Sarasota to break through the last logjam.

Cruise Day 8: Lund to Tenedos Bay
Posted by: pat 11 years, 11 months ago
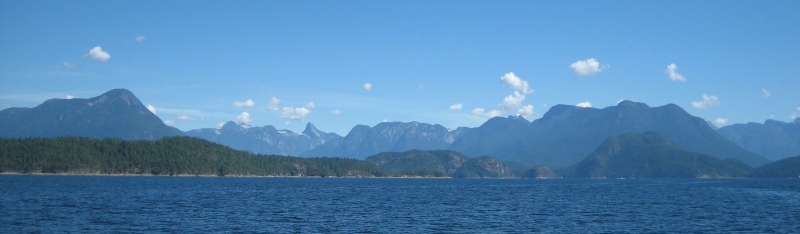
We steamed north with a destination of Tenedos Bay. Tenedos would turn out to be our favorite anchorage of the trip. It was spectacular and very rewarding to pull around the corner of Sarah Point and into the entrance of Desolation Sound. The mountains were beautiful, rising straight up from the water and revealing peaks like we see on the North Cascades Highway.
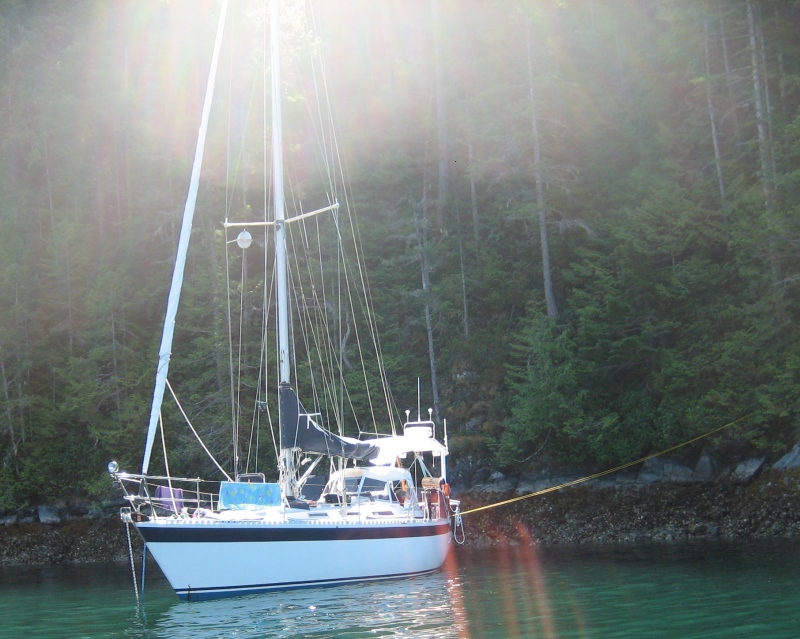
Tenedos has several spots where you can anchor, but much of it is quite deep. I knew we wanted to avail ourselves of the excellent swimming in Lake Unwin so sought out a spot near the trailhead. The prime spots right by the trailhead were taken and I ended up trying to anchor on the south side of the bay. The Rocna bit in and set well in about 100 feet of depth only about 75 feet off shore. We backed down on the short scope and I paddled in to shore to attach the stern tie. The water was quite clear and packed with jelly fish. I sliced my foot a bit climbing up over the hordes of 8 – 10 inch oysters caking the rocky shoreline.

There was a bit of a breeze so we hung out to make sure the anchor was solidly holding us while we swam and enjoyed lunch. The water temperature was a very pleasant 72 degrees F. We were entertained by a small hobie cat that zipped around the bay in the breeze and planned our trip to the lake.
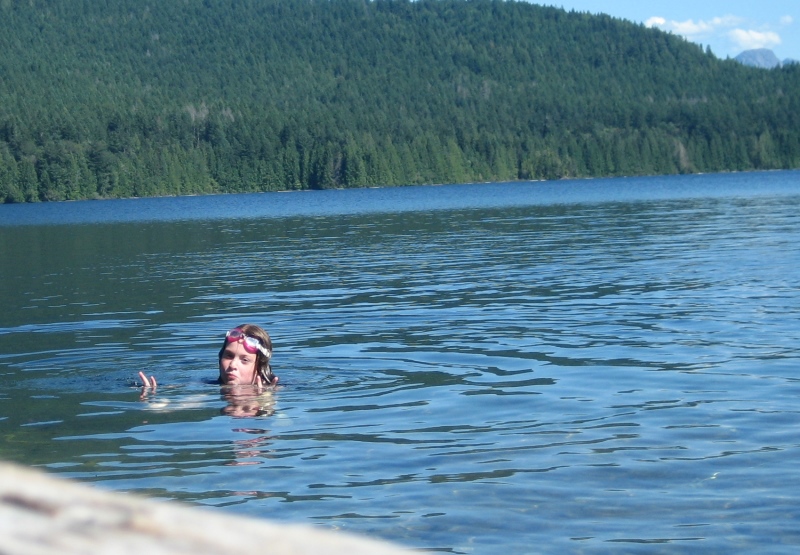
Lake Unwin is a huge and excellent swimming lake. There are many spots where you can clamber down from the trail that goes along the shoreline and find a private rock or beach to enter the water. It is very warm and clear, and with the ability to spread out it does not feel crowded at all. Despite the fact that there were always half a dozen dinghies at the trailhead, we never had to share our space with anyone except when we were lazy and took the first prime rock right at the point where the trailhead hits the lake. Don’t try swimming near the big log jam where the trail hits the lake: take the trail to the left and make your way to a sunny rock where you can swim.
The one thing to be aware of that I did not see on our first excursion to the lake is a sign advising that the use of soap in the lake is forbidden. There are a few bathing holes in the stream that spills from the lake into the bay where you can bath, but they are tricky to get to.
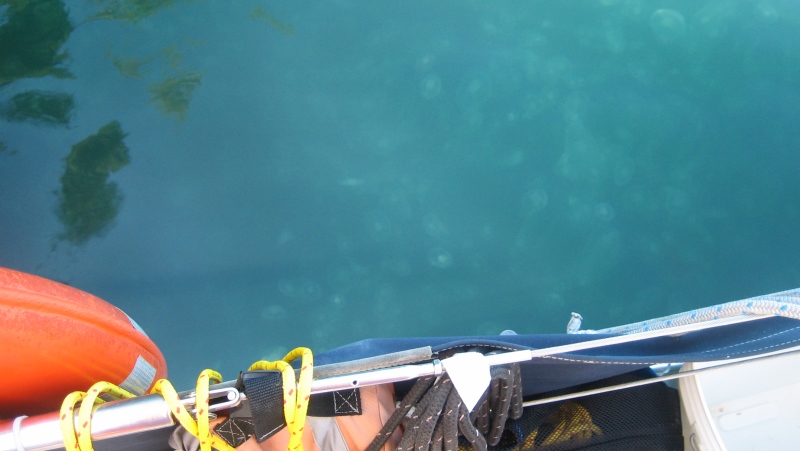
The girls nicknamed Tenedos Bay “Jellyfish City” due to the thousands of white jellies floating all around us during the day. Strangely, in the morning they were all gone. Maybe it is a tidal thing. They were benign and politely remained at about 12 feet and deeper, below our normal swimming range.

We spent the day swimming. That was pretty much it. And it was very good. We probably all clocked several hours in the water.
One piece of marine excitement was the failure of the electric water pump while I was doing the dinner dishes. This is the pump that drives the water pressure for the galley and head sink. But like a good Eagle Scout, I was PREPARED! Several years ago I had purchased a spare pump which had sat quietly waiting at the ready for this moment. After about 30 minutes I had the swap complete and we were back in business. Then I just had that uneasy feeling when the department of redundancy department is empty…what if the new pump should fail now? The galley does have a decommissioned manual foot pump that I have ignored to date but which occurred to me might make a viable last-ditch backup option.
Of course gloating over this has jinxed it. The day after I wrote this blog post I was at the boat working on the holding tank when the water pump went haywire. I wasn’t sure it was the pump. It just ran slowly non-stop. It could have been a leak but I couldn’t find one, so I tried swapping it with my newly procured spare which worked perfectly. Maybe the o rings in the spare pump had dried out while in storage, or maybe something cracked in this last bout of hard freeze weather. It does seem uncanny that it gave up the day after I put into words my hubris for spare parts provisioning. I won’t even mention the other spares I have on board for fear of a similar curse. I do now have three of these water pumps in different states of working and not working, so I console myself with the thought that I am now in a perfect position to disassemble and bench test the broken ones to determine if they are fixable.
Kim also observed that the fridge didn’t seem as cold as it should be or had been in the past. She has a bit of a thing with the fridge. Food safety is one of her hot buttons, as is having a disciplined system of food storage. It was still operating but I agreed it seemed to be having trouble keeping pace with the hot weather. I assured her that this didn’t need to threaten the trip and we could just supplement it with block ice at our next stop, Refuge Cove.
Cruise Day 7: Garden Bay to Lund
Posted by: pat 11 years, 11 months ago
It has been a while but I’m going to pick up this slowly developing marine travelogue again with our journey from Garden Bay to Lund. We got off to an early start that should put us into Lund around 1:00 PM. It was clear it was going to be another scorcher, and very calm once again.
We passed an interesting sight a few miles out of Pender Harbor. Someone must have bought a small covered dock second hand and was moving it to its new home. The manner in which it was being moved was striking. A small boat with an outboard was docked in the slip of the dock and was just motoring the dock north up the coast. First time I have ever seen a dock under way.
The journey was a bit boring and hot. We motored north up the entire length of Texada Island, passing many of the danger and ditch spots I had carefully researched while planning the trip. We are looking forward to the passage making days coming to a close, and are grateful for the lack of weather drama. As we passed Powell River I recalled that Pat Okell had told me his brother Cam and family would be at the family beach cabin during our trip, so I got him on the phone to see if he could meet up with us. Cam had other plans but I spoke with Rob, the elder Okell, about connecting with Pat and family later in the month.
I know to date these little updates on our cruise have been a bit of a whingefest with the complaints about this and that, but I have very little in the way of complaints about Lund. We ended up spending more nights in Lund than any other spot on this trip. We didn’t plan it that way, but there are certainly many worse ports to end up spending unplanned time. So please excuse me while I sing the praises of Lund!
First the marina. The marina is in exceptional shape with nice wide docks, pumpout on the dock, plenty of marina-provided hoses and fresh water, nice wood steps available for use by visiting boats for boarding, very friendly and professional dock staff, and clean but busy washrooms and showers. Wifi is pretty poor at the dock, but is good at the bakery on shore. Rafting is mandatory, but we avoided that indignity on our initial visit. The showers are 4 minutes for 2 loonies. The marina has all of the amenities you need with none of the frills. I always enjoy our stays on public docks in B.C., it feels like you are more connected with the community and nature when sharing dock space with locals and the local commercial fishing fleets.
You look right out over the floating breakwater at the Strait and Savory Island. It is a busy little harbor with constant comings and goings and lots of interesting boats to check out. There are a couple water taxis that buzz campers back and forth from Savory Island. The one thing it lacks is a good swimming option. Swimming in the marina is not a great idea what with the electrolysis risk and general hazards, and it isn't exactly a park-like location. It is pretty much right smack on the strait. It was quite hot by the time we were tied up and squared away with power connected, water tanks filled, etc. and I was drenched in sweat. Kim was getting worried I might expire from heatstroke and offered me a dockside hose drenching.
What with the Nanaimo liquor store being shut down from on B.C. Day, it was a huge relief to finally be somewhere I could restock the beer and liquor cabinets. Bear in mind this is after I was a good citizen and kept our beer and liquor inventory within the customs limits while crossing the border. I was down to maybe my last 6 pack of Fremont Interurban IPA and ready to stock up on Molson Canadian ($64 for a 30 pack!) when I saw the "artisan IPA" 6 packs in the fridge room at the general store. I threw a "tester" 6 pack into our basket to see if it passed the test of crap Canadian craft beer. There was a toothless local behind me in the checkout lane who saw my beer selection and declared "That stuff should be mandatory eh? Oh yeah it’s an IPA. Should be served at 5C or 41 Fahrenheit." Do Canadians do Celsius to Fahrenheit conversions in their heads?
On day 7 our laundry bag was starting to fill up so we were eager to do a few loads of laundry. Elizabeth toted the bag up to the laundry room (she wanted to use the superior wifi signal on shore to Facetime some friends) and found...the power had gone out! A fellow laundress informed us it was a 1,000 home outage and could take hours, explaining that it is "an end of the road thing." She also told me that she had just moved from Cortes Island and felt like she was in the big city now (haha!) and that on Cortes they are accustomed to the power going out for days at a time. Lund is famous for being milepost zero on the road that goes to the end of Chile. After the power came back on we had to play musical chairs with the dryers to get one that would actually dry our load. After my 3rd visit to the hotel’s front desk to get loonies for the dryer I mentioned this and received the sympathetic response “yeah…our dryers are really not very good.” Thanks for the sympathy…now how about getting somebody to fix it?
The other nice thing about Lund is...we are DONE with long passages. From here on out (until I do the return trip with Greg and Katherine) all of our trips will be in the range of 3 or 4 hours. We are inflating the kayaks and getting ready to go on "island time" with leisurely meals, lots of swimming, exploring the little coves and inlets, and not stressing about the straits or Whiskey Golf.
Food
I did a recon mission to the Boardwalk Restaurant. It is supposed to be local seafood and advertises that it offers "more than just fish and chips." A look at the menu corroborated this claim. Barely. They also have some burgers and...maybe a hot dog. The Lund Hotel had a much more extensive menu, and we figured we could get the wifi password so we went there. It was a little underwhelming. Kim rated her steak sandwich as the fourth best out of the three she tried that trip. The chowder was a bit anemic and lacking in much rich flavor. I can however recommend the Lund Burger without reservations. Very nice with cheddar, bacon, and mushrooms. And the girls found the ice cream pie transcendant, earning Lund “favorite spot” status with Cathy.
Washrooms and Showers
There are two private washrooms with showers. They run for 4 - 5 minutes for two loonies. The shower stall in the washroom on the left is quite large. Two people easily fit in them, and I saw many couples going in together. The shower ran long, much longer than I needed. I just ran it on cold to cool down at the end. Very nice and very clean. The one thing I would change is to get rid of the carpet floormats outside the showers. They were soaked through and not very appealing. You don't have carpet in your bathroom at home do you? Get the Entworks woodworking dude who is on the boardwalk to whip up a couple of nice cedar grates for the showers.